Saturday, October 25, 2014

Linux Machine Preparation

The purpose of this post is to provide a basic (though incomplete) guide to preparing a Debian based machine to perform very basic forensic analysis of other computers and electronic devices.  It is quite possible that this will be modified multiple times over the duration of this blog.

First things first, you will need a computer or virtual machine running 64 bit Debian, Ubuntu, or some variant.  If you are a linux wizard then you probably can skip this post (minus the list of tools) and user your preferred distribution.  If you can't get your hands on a 64 bit machine you may find that some of the tools I am listing are incompatible and will not install.  If you are running a VM make sure that the guest additions are installed before installing the other tools.

I normally run Ubuntu 14.04 because it's repository is usually more up to date.  For this example, I wanted to build a forensic machine with the Debian based Crunchbang distribution seen below.  This distribution is quick and lightweight, leaving me more resources for data crunching.


So now lets talk about what we need to actually do some forensic analysis.  Below I've compiled a list of tools I am currently using in linux in the order of installation.  These will be covered in more detail following the list.

There are many other tools that could be added to this list and I'd love to hear any recommendations in the comments section.

This rest of this post will be discussing the installation of these tools.  If this list continues to grow a series of pages dedicated to machine setup can be made.  As a rule of thumb I prefer to download and compile the latest version of software that is available.  Sometimes this won't be possible and the best option will be to use the distributions repository.

Lets start with libewf.  The libewf package allows you to work with multiple forensic file types including the EnCase File Format.  Further information can be found here.  We'll install this first because xmount depends on it and The Sleuth Kit recommends it.

This package is fairly simple to install and a detailed list of instructions for installing this tool on just about any platform can be found here.  The installation process I used in Crunchbang can be seen below:


$wget https://53efc0a7187d0baa489ee347026b8278fe4020f6.googledrive.com/host/0B3fBvzttpiiSMTdoaVExWWNsRjg/libewf-20140608.tar.gz
$sudo apt-get install build-essential debhelper fakeroot autotools-dev zlib1g-dev bzip2 libssl-dev libfuse-dev python-dev
$tar xfv libewf-20140608.tar.gz
$cd libewf-20140608/
$cp -rf dpkg debian
$dpkg-buildpackage -rfakeroot
$cd ..
$sudo dpkg -i libewf_20140608-1_amd64.deb libewf-tools_20140608-1_amd64.deb

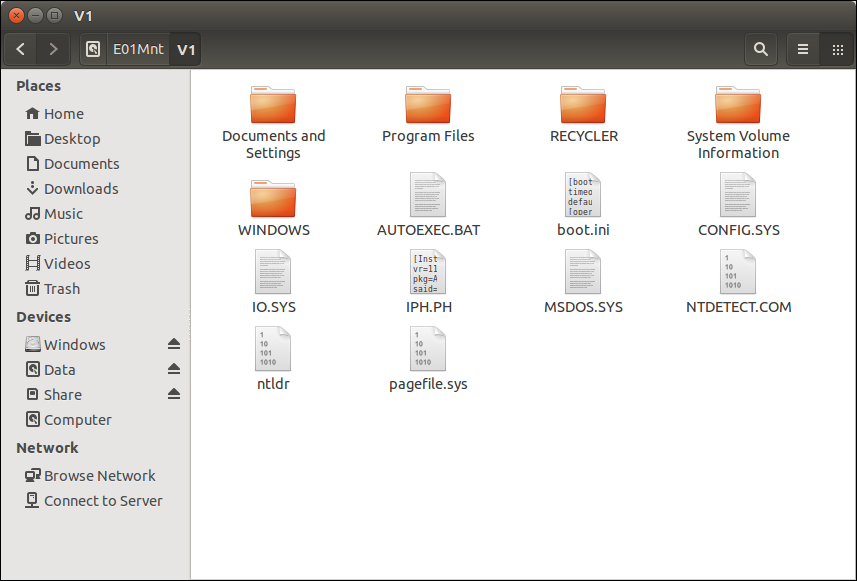
Next I installed Xmount.  This tool allows us to work with different data formats including EnCase File Format, DD (raw), and multiple virtual disk types.  More information on this can be found here.  Below is the installation process I used to install Xmount:

$wget http://deb.pinguin.lu/amd64/xmount_0.7.2_amd64.deb
$sudo dpkg -i xmount_0.7.2_amd64.deb

Next lets get one of our primary tools installed.  The Sleuth Kit has been covered some already in this blog and will continue to be one our primary tools.  The installation for this on Crunchbang required some work.  I tried compiling this tool from source but encountered some java issues.  I reached out to the Crunchbang forums for some assistance with my issue and was promptly pointed towards "backports".   I knew I was going to need to add Debian's backports repo to my system so I modified the /etc/apt/sources.list file by using the command $sudo nano /etc/apt/sources.list.  Once the editor opened I added the following line to the end of the file:

## Debian Backports
deb http://http.debian.net/debian wheezy-backports main contrib non-free

So that my completed sources.list looks like this:

## CRUNCHBANG
## Compatible with Debian Wheezy, but use at your own risk.
deb http://packages.crunchbang.org/waldorf waldorf main
deb-src http://packages.crunchbang.org/waldorf waldorf main

## DEBIAN
deb http://http.debian.net/debian wheezy main contrib non-free
#deb-src http://http.debian.net/debian wheezy main contrib non-free

## DEBIAN SECURITY
deb http://security.debian.org/ wheezy/updates main
#deb-src http://security.debian.org/ wheezy/updates main

## Debian Backports
deb http://http.debian.net/debian wheezy-backports main contrib non-free

Next I downloaded the latest Debian backports package.

$ sudo apt-get update
$ wget http://ftp.us.debian.org/debian/pool/main/s/sleuthkit/sleuthkit_4.1.3-3~bpo70+1_amd64.deb

And then finished the installation as follows:

$ sudo dpkg -i sleuthkit_4.1.3-3~bpo70+1_amd64.deb
$ sudo apt-get -f install

The apt-get -f install resolved the remaining dependencies for the sleuthkit install.

To install this on Ubuntu I've been pointed towards the repo setup below, which adds many tools that may be helpful:

$ sudo add-apt-repository ppa:kristinn-l/plaso-dev
$ sudo apt-get update
$ sudo apt-get install python-plaso

You will notice quite a few tools but primarily this will give you an up to date functioning sleuthkit installation without all the compiling.

Next I installed Testdisk with PhotoRec for data carving (more infor here):

$ wget http://www.cgsecurity.org/testdisk-7.0-WIP.linux26-x86_64.tar.bz2
$ tar -vxjf testdisk-7.0-WIP.linux26-x86_64.tar.bz2

Easy enough.

Then it was XnViewMP for viewing the images and videos (more info here):

$ wget http://download.xnview.com/XnViewMP-linux-x64.deb
$ sudo dpkg -i XnViewMP-linux-x64.deb

and KeepNote fore reporting:

$ wget http://keepnote.org/download/keepnote_0.7.8-1_all.deb
$ sudo dpkg -i keepnote_0.7.8-1_all.deb
$ sudo apt-get -f install

GThumb is another tool for viewing images.  The latest version was located in the default repository:

$ sudo apt-get install gthumb

Finally, I installed Guymager.  This tool is a forensic imaging tool with a GUI.  The version in the repository will be sufficient:

$ sudo apt-get install guymager

That's it.  Hopefully this helps anyone wondering how to get the basics going.  I recommend learning one tool at a time.

NOTES:  ppa:kristinn-l/plaso-dev

Saturday, August 2, 2014

File Carving with PhotoRec

This post relies on an understanding of information from a previous post that can be found here.  The purpose of this post is to discuss file carving (in the general sense) and then specifically the PhotoRec tool.  Some things I won't be discussing are Foremost and Scalpel, two other tools commonly used for file carving (I gotta leave some information for later) or file and ram slack.

Lets start with file carving concepts.  What is it and how do we use it.

According to forensicwiki.org:
File Carving, or sometimes simply Carving, is the practice of searching an input for files or other kinds of objects based on content, rather than on metadata. File carving is a powerful tool for recovering files and fragments of files when directory entries are corrupt or missing, as may be the case with old files that have been deleted or when performing an analysis on damaged media. Memory carving is a useful tool for analyzing physical and virtual memory dumps when the memory structures are unknown or have been overwritten.

Essentially file carving is searching for files or parts of files on a disk in areas of the disk that are unstructured data.  The way that it does this is by looking for specific headers and footers of file types.  For example lets take a look at the following picture:


Go ahead and download (NOTE: you must open the image completely to download it properly) this image to your desktop and we will look at the hex (I've only copied out the first fifty bytes of the file for this example).

$ cat forExample.png | hd | less
00000000  89 50 4e 47 0d 0a 1a 0a  00 00 00 0d 49 48 44 52  |.PNG........IHDR|
00000010  00 00 02 26 00 00 01 6d  08 02 00 00 00 bc db 36  |...&...m.......6|
00000020  23 00 00 00 09 70 48 59  73 00 00 0b 13 00 00 0b  |#....pHYs.......|
00000030  13 01 00 9a 9c 18 00 00  00 07 74 49 4d 45 07 de  |..........tIME..|
00000040  08 03 00 36 11 25 89 82  57 00 00 20 00 49 44 41  |...6.%..W.. .IDA|
00000050  54 78 01 00 fc 80 03 7f  00 ff ff ff ff ff ff ff  |Tx..............|

The first eight bytes ( 89 50 4e 47 0d 0a 1a 0a ) of the file are the file header.  Notice on the right side that in plane text (ASCII) the bytes include the file extension for this particular file ( .PNG.... ) the dots are hex characters that can't be displayed in ASCII.  Now lets take a look at the next picture:


And lets view that one in hex:

$ cat forExample2.jpg | hd | less
00000000  ff d8 ff e0 00 10 4a 46  49 46 00 01 01 01 00 48  |......JFIF.....H|
00000010  00 48 00 00 ff db 00 43  00 ff ff ff ff ff ff ff  |.H.....C........|
00000020  ff ff ff ff ff ff ff ff  ff ff ff ff ff ff ff ff  |................|
*
00000050  ff ff ff ff ff ff ff ff  ff ff db 00 43 01 ff ff  |............C...|

We can see that despite these photos looking the same they have different headers.  Every file type has headers (some even have footers) that help us and the computer to identify them.  Each of these headers is unique.

Now think of how data is stored.  Remember how data for a file always starts at the beginning of a sector?  This makes it pretty easy to data carve right?  Now, if you saw the large JFIF in unallocated disk space you would know that a JPEG image was stored there!  Data carvers work in the same way.  They look through the unallocated space and search for file header and footers (or file signatures).  One thing to note is that modern file carvers look at all the data, not just the beginning of each sector.  The reason for this is because databases are considered one file but may contain multiple images which means the beginning of the file may be found anywhere in a sector.  Databases are not the only files that may contain an image inside of them.  Compound document files, audio files and others may contain images inside of them as well.

So lets talk about PhotoRec.  PhotoRec is an open source file carving tool that is fairly simple and can be used to carve complete disks (or disk images) or even better, unallocated space.

I started this process using an E01 file similar to what we've used in the past and any E01 file will work if you wanted to do this yourself.

$ img_stat ITEM_2.E01
IMAGE FILE INFORMATION
--------------------------------------------
Image Type: ewf

Size of data in bytes: 4089446400
MD5 hash of data: 70617ea51ddb14b412b3889d861e0c83

$ img_cat ITEM_2.E01 | md5sum
70617ea51ddb14b412b3889d861e0c83  -

$ mmls -B ITEM_2.E01
DOS Partition Table
Offset Sector: 0
Units are in 512-byte sectors

     Slot    Start        End          Length       Size    Description
00:  Meta    0000000000   0000000000   0000000001   0512B   Primary Table (#0)
01:  -----   0000000000   0000000141   0000000142   0071K   Unallocated
02:  00:00   0000000142   0007987199   0007987058   0003G   Win95 FAT32 (0x0c)

$ xmount --in ewf ITEM_2.E01 /E01Mnt/RAW/
$ ls /E01Mnt/RAW/
ITEM_2.dd  ITEM_2.info

You have all seen this before but I wanted to you to see it again.  If you need to review any of these commands you can find them here:

At this point we've confirmed the content of the E01 file is still accurate.  Identified the primary partition starts at sector 142, and exposed the E01 as a .dd file.

$ cat /E01Mnt/RAW/ITEM_2.info 
The following values have been extracted from the mounted image file:

Case number: 2014-********
Description: ITEM_2
Examiner: ***
Evidence number: ITEM_2
Notes: ***********************
Acquiry date: Thu Jul 24 15:11:40 2014
System date: Thu Jul 24 15:11:40 2014
Acquiry os: Windows 7
Acquiry sw version: ADI3.1.4.6
MD5 hash: 70617ea51ddb14b412b3889d861e0c83
SHA1 hash: ac62c32e9ba584b7c3c427530ae6173da790cb8a

$ md5sum /E01Mnt/RAW/ITEM_2.dd
70617ea51ddb14b412b3889d861e0c83  /E01Mnt/RAW/ITEM_2.dd

Next I reviewed the .info file created when xmount made the E01 visible as a .dd file using the cat command (which I sanitized for anonymity sake.  Now we can use PhotoRec on this device.

$ sudo photorec /E01Mnt/RAW/ITEM_2.dd 
PhotoRec 6.14, Data Recovery Utility, July 2013
Christophe GRENIER <grenier@cgsecurity.org>
http://www.cgsecurity.org

Once the command has successfully executed we will get an interactive environment in the terminal like you see below.


Below you can see that you have the option to carve the entire disk or just the FAT32 file system.


Below is you can see that PhotoRec gives you the option to carve for more than just photos like the name implies.


Below you select your file system.


Then you will be asked if you want to carve the whole partition or just the unallocated space.


Finally, when it has completed finished searching the space it will tell you how many files were carved and where it placed them.


There is a step where you select where you want the files exported but that step is not displayed.  In the future I will be writing a post on file carving with both Foremost and Scalpel.

Enjoy!

Friday, August 1, 2014

Disk Restoration and Computer Forensics

I got a new hard drive to replace the drive in my laptop's hard drive caddy today.  I wanted to copy the data from my existing drive exactly as it is to my new hard drive and I figured this may be a good time to discuss Disk Restorations.  It's most applicable for general IT purposes but can be very helpful for doing forensics as well.

The concept is simple, I can create a perfect duplicate of a suspect hard drive.  I can then place the duplicated hard drive into the suspects machine, keeping the suspect hard drive disconnected and then boot that hard drive to see exactly what the user would have seen.  If your suspect machine is Windows based this may be the easiest way to get a good look at the environment because it is very difficult to make a virtual machine from the evidence file.

Lets get started.  I started this process in Windows with EnCase Imager to show how it can be done using EnCase (note I was doing it direct hard drive to hard drive with no write block protection which is NOT forensically sound).  Below you can see the lack of space.  I was duplicating the "Data" volume onto a new 1TB drive.


Next I opened EnCase Imager (Guidance Software) to add the disk to the "Case".  Below you can see the default EnCase Imager screen.


Here we will be selecting the "Add Local Device" link.


On this screen I deselected everything.  For forensic purposes you should have the device write blocked.


Here you can see I have selected disk "1", containing the volume "Data" and the new disk ("3") below it.


After selecting the drive and clicking next we can now see and navigate the disk and its content.  Most of the EnCase capabilities are not present in the Imager but the core interface is the same.


To start the restoration process we need right click on the disk, select "Device" and "Restore..."  Had we been wanting to create an E01 (EnCase Evidence File) of the device we could have used the "Acquire" option here.


It will now ask you before populated a list of disks.


Here I've selected the disk I wish to restore to.


Because this is not a case I disabled the "Wipe remaining sectors on target" option.  If I had been doing this for a case I would have left this option selected because it is not forensically sound to have any data on a disk being used to host suspect data.  The reason for this is related to how a disk stores data.  If you do not wipe the remaining data it is possible for data carvers to recover files that are not on the original disk.  We call this cross contamination.  Note: wiping the remaining sectors will take a very long time because it is writing h/00 across the entire disk, then verifying that it has been written.


Obviously if you have any other data on this disk it will be destroyed (particularly if you zero the remaining sectors).


Once the process has started you will see it in the bottom right hand corner.


I cancelled this process because it would have taken over 15 hours and I wanted to cover how to do this with the Linux tool dd.  The first thing I needed to do was identify which drive was which.  Using Ubuntu's Disk utility I am able to see which disk is which disk is which "/dev/sdb" and "/dev/sdc" are the disks that I am using with sdb being the source and sdc being the destination drives.  It's important to note that I'm not just copying the volume but everything including the Master Boot Record and unallocated space.  (Also note an error in this first screenshot.  You can see the screenshot tool I was using to capture the window).


On the second screenshot you can see that the volume information during our copy attempt with EnCase had already been successfully copied over.  If we were to look at this volume with a hex editor we would find that the majority of that volume was empty (because we stopped the process before it was completed).  Now that we know our hard disk addresses we can Restore the disk using the dd tool.

If we wanted to zero out our destination drive we could use the following command:

$ sudo dd if=/dev/zero of=/dev/sdc bs=4k

This is a fairly clear command but lets break it down.  The "if=/dev/zero" is our source device (in this case we are using a default Linux file "zero" that is completely full of zeros specifically designed for wiping data).  dd will be copying the contents of this file to the destination device which we have designated with the "of=/dev/sdc" portion of this command.  The "bs=4k" stands for block size is telling dd to copy 4096 bytes at a time.  This command will destroy all data on the disk.

Once the drive has been successfully wiped (which I did not do for this situation) we will need to hash our source device.  To do this we can use the command cat and the md5sum tool with a Linux pipe.

$ sudo cat /dev/sdb | md5sum

NOTE: this only works with disks that are the exact same size.  If the drives are not the exact same size we can do this with the volumes on the drive.  This will ensure the integrity of the volumes and is what I did in this case.

$ sudo cat /dev/sdb1 | md5sum
a35a8d086e23ed20cdccafce41c08802  -

Now that we have the hash values for the volumes we can restore the drive.  The dd command we will use is very similar to the command we used to wipe the disk but includes a few more options.

$ sudo dd if=/dev/sdb of=/dev/sdc bs=4096 conv=notrunc,noerror,sync
39072726+0 records in
39072726+0 records out
160041885696 bytes (160 GB) copied, 3092 s, 51.8 MB/s

This again has our source and destination drives listed and this is a DISK to DISK copy.  It also has a designated block size.  Additionally we have the "conv=notrunc,noerror,sync" options specified.  "notrunc" tells dd not to truncate any data (and reduces errors).  "noerror" tells dd to not stop if there is an error (by default it will stop).  And finally, "sync" writes zeros for read errors (EnCase and FTK Imagers will also write zeros for errors during imaging).  If you wanted to create a disk image of this drive you could have done this:

$ sudo dd if=/dev/sdb of=/ForensicImages/ITEM_1.dd bs=4096 conv=notrunc,noerror,sync

Additionally, if you want to see the progress of your dd transfer or image you can create a new tab and use the following command to see the activity of the dd application:

$ watch -n5 'sudo kill -USR1 $(pgrep ^dd)'

Under certain circumstances the speed of the dd process can be sped up using some variable commands.  Additionally, hashing can be performed by using a | and && to pull it all into one command.  If I use this option I may cat the contents of the files and copy everything from the original command through the cat to help preserve the process

a9dadc2026fa0a1ed4994e8110b952e0e5cdf44776f63c95c913cf68a35fec52  /dev/sda
a9dadc2026fa0a1ed4994e8110b952e0e5cdf44776f63c95c913cf68a35fec52  Disk.dd

The previous lines were written to a file using the commands below.  No lines were added or removed.

root@slitaz:/media/cdrom/ImageFiles# sha256sum /dev/sda > Dis
kHash && dd if=/dev/sda bs=4M | dd of=Disk.dd && sha256sum Disk.dd >> DiskHash
19079+1 records in
19079+1 records out
156301488+0 records in
156301488+0 records out
root@slitaz:/media/cdrom/ImageFiles# ls
Disk.dd   DiskHash
root@slitaz:/media/cdrom/ImageFiles# cat DiskHash 
a9dadc2026fa0a1ed4994e8110b952e0e5cdf44776f63c95c913cf68a35fec52  /dev/sda
a9dadc2026fa0a1ed4994e8110b952e0e5cdf44776f63c95c913cf68a35fec52  Disk.dd

Below I used EnCase to create an E01 file from the dd created above.
Additionally, I calculated the SHA1 hash value of the dd file and found it matched the SHA1 value produced during the imaging process below.

Ideally, I would have done the SHA1 hashing prior to and after collecting the data but since this was not for forensic purposes I simply confirmed the original DD image and E01 images are the same binary data.

Name: LenovoT61-BaseImage
Path: G:\ImageFiles\LenovoT61-BaseImage.E01
EnCase Imager
Status: Completed
Start: 03/23/16 08:30:57 AM
Stop: 03/23/16 09:21:50 AM
Time: 0:50:53 
Name: LenovoT61-BaseImage
Path: G:\ImageFiles\LenovoT61-BaseImage.E01
Acquisition MD5: 2CAF4BD3D8C6F609295DFE9B2E53DCAE
Acquisition SHA1: F6883398295DA563BA3D0286AAA18EEB73C1FD0C
EnCase Imager
Status: Completed
Start: 03/23/16 09:21:50 AM
Stop: 03/23/16 09:36:35 AM
Time: 0:14:45 
LenovoT61-BaseImage: Verified, no errors

But we are not doing that today and if we were we would probably use a different tool (ewfimager or dcfldd for CLI imaging).

The copy took only about 2 hours and I was using a slow 5400RPM source drive and restoring a 160 gigabyte drive.  There are a few other factors like the speed of the disk controller (this is where your SATA I, II, and III connection speeds make a difference).

Forensically the next step is to re-hash the source drive.  This process takes a large amount of time (approx 45-50 minutes in my case) because entire volume has to be read and processed.

$ sudo cat /dev/sdb1 | md5sum
a35a8d086e23ed20cdccafce41c08802  -

We have just verified that the volume is exactly the same as it was prior to us creating the restore disk.  So lets make sure that this restore disk is correct by hashing the resource disks volume.

$ sudo cat /dev/sdc1 | md5sum
a35a8d086e23ed20cdccafce41c08802  -

So both volumes are exactly the same.  This process took less time because this drive is much faster than the original drive (approx. 30 minutes).  Forensically speaking, now you would place the copied disk into the suspect machine in place of the original and boot it up, allowing you to view the suspects working environment without ever compromising the original evidence.

 Below I included a screenshot of the resources being used by the md5sum tool.


I had a case about six months ago that I needed this for.  Here is a synopsis:
I had a large number of items in this case including a 2 terabyte external hard drive.  The external drive was a Western Digital Passport and was encrypted.  I also had about 3 laptop computers that we had recovered during a search warrant.  During my exam on one of the laptops I noticed that the Western Digital encryption software was installed on this Windows based computer and a shortcut was on the users Desktop.  I am aware that it is possible for the software to auto de-crypt and mount the encrypted drive.  Using EnCase I completed a restore of this laptops hard drive and booted up the laptop with the restored disk.  I then connected the drive to the now running suspect computer.  By default the drive was de-crypted and mounted allowing me to use EnCase Imager to create an image over the live system.  Had the user not been lazy and unwilling to enter the password each time the drive was connected I suspect I would have never been able to defeat the drives encryption.
--------------------------------------------------------------------------------------------------------------------------- 


Now for the not so forensic part.  To make use of the additional 840 gigabytes on the new drive I needed to expand the existing volume to take up the rest of the disk.  To do this I needed the gparted tool.

$ sudo apt-get install gparted

Then I used

$ gksudo gparted

to open the program.


In the top right hand corner I selected the drive that I wanted to make changes to.  You can see much of this disk is unallocated.  Using the orange arrow I selected to resize the volume (for this to work the volume must NOT be mounted).  Then I dragged the volume to its maximum size.


Then hit the check mark to apply the changes.


It's going to want you to make sure that this is exactly what you want to do because if you are wrong it may put a damper on your day!


And wallah!  It's off.


Once you are done it will give you the details about the operation.


Sunday, July 27, 2014

Physical Disks and Logical Volumes

At the beginning of last week I took a leap into the world of Open Source forensics at a new level.  My goal is to complete a full case using only open source tools.  As a result, more posts.

So the purpose of this post is a basic overview how physical disks relate to logical volumes and file systems specifically the New Technology File System (NTFS).  Lets take a look at physical disks.  Physical disks is referring to hard drives.


Hard drives historically have been magnetic disks or platters that spin.  More recently we have seen flash memory/solid state drives that stores the data on microchips.  Both of these drives, typically, store data in 512 byte sectors.  These sectors are the smallest physical storage unit on the drive.  Sectors are tracked with factory set tracking controlled by the hard drives circuit board.

Ideally, all of a files data would be stored contiguously or in a linear fashion, however, this is impractical because files are continuously being moved around, added or deleted.  Another consideration is that files are NOT perfectly sized to fit into these disk sectors.  Also, we haven't addressed logical volumes yet.

Logical volumes are data sets on the disk and contain a file system (like NTFS, FATxx, EXTx, ZFS, JFS, UFS, XFS, HFS+, and many, many others).  These file systems refer to and track data in clusters.  Clusters may contain 1 or more sectors and have a minimum size of 512 bytes but are commonly larger on bigger data sets such as multiple terabyte volumes.  These logical volumes are contained in partitions.  Partitions can be seen with the Sleuth Kit's mmls command.  You can often see the file system related to that partition as well as seen below:

$ mmls -B nps-2008-jean.E01
DOS Partition Table
Offset Sector: 0
Units are in 512-byte sectors

     Slot    Start        End          Length       Size    Description
00:  Meta    0000000000   0000000000   0000000001   0512B   Primary Table (#0)
01:  -----   0000000000   0000000062   0000000063   0031K   Unallocated
02:  00:00   0000000063   0020948759   0020948697   0009G   NTFS (0x07)
03:  -----   0020948760   0020971519   0000022760   0011M   Unallocated

For more information on the mmls command and the Master Boot Record refer to my previous post here.

So in short and to summarize, data is stored physically in 512 byte sectors.  Those sectors are contained in one and only one logical cluster.  That cluster may or may not contain other sectors.  That cluster is tracked by the file system.

Now to talk about files and, loosely, how files are stored on a disk.  Files are a single entity and are very important to forensic exams.  Files can be smaller than a sector or larger than a cluster.  So how do file systems store these odd numbers?  It's really quite simple.

Because file systems track information at the logical cluster level all files are contained in at least one cluster and only one file can be stored in each cluster.  For example, if we have a file system with a logical cluster size of 1024 bytes (or two sectors) and a file that is 1411 bytes the file system will be forced to allocate two full clusters to the file.  The first file will contain the first 1024 bytes of the file.  The remaining 387 bytes will go into the second cluster.  This leaves 637 bytes in that cluster that isn't being used.

The second cluster in this example still contains two physical sectors.  Of the two physical sectors only the first is being used.  In the first sector only 387 bytes is being used.  This leaves 125 bytes in that first physical sector that isn't being used.  This is generally how files are stored.  There are a few exceptions to this rule including NTFS which may store files under a certain size inside of the Master File Table.

Files will always start at the beginning of a cluster and in turn will also always start at the beginning of a sector.  This doesn't mean that the beginning of each cluster or sector always contains the beginning of a file.  Hopefully, this example made that clear.  In the next post I am going to discuss data carving and things like ram slack and file slack.

Tuesday, June 24, 2014

SQLite Databases and Internet HIstories


The first step in this post is to mount the evidence file for access to the file system and the contents of the drive.  I have covered this topic with two different tools already.  I have covered this using xmount and I have covered this using ewfmount tool.  Please reference one of these posts before continuing.

Once we have completed the final steps of mounting:

$ xmount --in ewf nps-2008-jean.E?? /E01Mnt/RAW/
$ ls /E01Mnt/RAW/
nps-2008-jean.dd  nps-2008-jean.info
$ sudo mount -o ro,loop,offset=32256 /E01Mnt/RAW/ewf1 /E01Mnt/V1

We can access the information contained in this evidence file.  Before continuing you will need to install the sqliteman application.

$ sudo apt-get install sqliteman

$ which sqliteman
/usr/bin/sqliteman

Sqliteman is a tool used to view and edit sqlite databases.  Please take the time to review the tool and its functionality.

These databases are important to us as examiners because a large amount of the everyday data that we need is stored in this format.  These files commonly have a .db or sqlite file extensions.  Internet histories, chat histories, address books, and many, many other items that may contain evidence are stored in this format.  I recently was working on a case where I needed to locate the usernames of all the users the operator of an Android based phone was communicating with on Kik Messenger.  I pulled all of the databases associated with Kik.  I located chat database and a separate user account database.

This is one of many graphical tools that can be used to parse out databases so if you find a better tool for this please post it in the comments section.  In a later post I will be discussing using the command line to navigate databases.  Now lets get back to it.

We are going to be looking at the browser internet histories for the evidence file nps-2008-jean.E01.  This evidence file has been our backbone for researching these tools up to this point.  In a future post I am also going to be parsing databases for current browsers, chat applications, and any other applications that might contain important information that I encounter.

The first thing we need to do is find our databases.  One simple way would be to browse the file structure and see what databases are stored on this machine.  Based off of the current mounting procedures we know the files are stored in /E01Mnt/V1/ like we see in the image below.


Browsing these files manually will take forever so lets try something different while back at the command line.

$ fiwalk nps-2008-jean.E01 > fiwalkoutput.data

We've seen this command before.  It's simply creating a file called fiwalkoutput.data that will store a multitude of data about each of the files in this volume.  A shortened version of the output may look something like this:

parent_inode: 11342
filename: Documents and Settings/Administrator/Application Data/Mozilla/Firefox/Profiles/towjib3x.default/content-prefs.sqlite
partition: 1
id: 217
name_type: r
filesize: 7168
alloc: 1
used: 1
inode: 11383
meta_type: 1
mode: 511
nlink: 2
uid: 0
gid: 0
mtime: 1210743530
mtime_txt: 2008-05-14T05:38:50Z
ctime: 1210743530
ctime_txt: 2008-05-14T05:38:50Z
atime: 1216603847
atime_txt: 2008-07-21T01:30:47Z
crtime: 1210743530
crtime_txt: 2008-05-14T05:38:50Z
seq: 10
md5: 698620dc14bd2b952f1556b7bdefd638
sha1: c81bcde4bd704f1b106df1affaa12ec895e1b917

Here we can see the file name and path and other pertinent information about this file.

$ grep sqlite fiwalkoutput.data 
filename: Documents and Settings/Administrator/Application Data/Mozilla/Firefox/Profiles/towjib3x.default/content-prefs.sqlite
filename: Documents and Settings/Administrator/Application Data/Mozilla/Firefox/Profiles/towjib3x.default/cookies.sqlite
filename: Documents and Settings/Administrator/Application Data/Mozilla/Firefox/Profiles/towjib3x.default/downloads.sqlite
filename: Documents and Settings/Administrator/Application Data/Mozilla/Firefox/Profiles/towjib3x.default/formhistory.sqlite
filename: Documents and Settings/Administrator/Application Data/Mozilla/Firefox/Profiles/towjib3x.default/permissions.sqlite
filename: Documents and Settings/Administrator/Application Data/Mozilla/Firefox/Profiles/towjib3x.default/places.sqlite
filename: Documents and Settings/Administrator/Application Data/Mozilla/Firefox/Profiles/towjib3x.default/search.sqlite
filename: Documents and Settings/Administrator/Local Settings/Application Data/Mozilla/Firefox/Profiles/towjib3x.default/urlclassifier3.sqlite
filename: Documents and Settings/Jean/Application Data/Mozilla/Firefox/Profiles/c3xj7bxx.default/content-prefs.sqlite
filename: Documents and Settings/Jean/Application Data/Mozilla/Firefox/Profiles/c3xj7bxx.default/cookies.sqlite
filename: Documents and Settings/Jean/Application Data/Mozilla/Firefox/Profiles/c3xj7bxx.default/downloads.sqlite
filename: Documents and Settings/Jean/Application Data/Mozilla/Firefox/Profiles/c3xj7bxx.default/formhistory.sqlite
filename: Documents and Settings/Jean/Application Data/Mozilla/Firefox/Profiles/c3xj7bxx.default/permissions.sqlite
filename: Documents and Settings/Jean/Application Data/Mozilla/Firefox/Profiles/c3xj7bxx.default/places.sqlite
filename: Documents and Settings/Jean/Application Data/Mozilla/Firefox/Profiles/c3xj7bxx.default/places.sqlite-journal
filename: Documents and Settings/Jean/Application Data/Mozilla/Firefox/Profiles/c3xj7bxx.default/search.sqlite
filename: Documents and Settings/Jean/Local Settings/Application Data/Mozilla/Firefox/Profiles/c3xj7bxx.default/OfflineCache/index.sqlite
filename: Documents and Settings/Jean/Local Settings/Application Data/Mozilla/Firefox/Profiles/c3xj7bxx.default/urlclassifier3.sqlite
filename: Documents and Settings/Jean/Local Settings/Temp/sqlite_7Mhy8N5FkPkwwQd
filename: Documents and Settings/Jean/Local Settings/Temp/sqlite_ooepoG0zgOotsEE
filename: Program Files/Mozilla Firefox 3 Beta 5/sqlite3.dll
filename: Program Files/Mozilla Firefox 3 Beta 5/sqlite3.dll.moz-backup
filename: Program Files/Mozilla Firefox 3 Beta 5/sqlite3.dll

$ grep -F .db fiwalkoutput.data 
filename: Documents and Settings/Administrator/Application Data/Mozilla/Firefox/Profiles/towjib3x.default/key3.db
filename: Documents and Settings/Administrator/Application Data/Mozilla/Firefox/Profiles/towjib3x.default/cert8.db
filename: Documents and Settings/Administrator/Application Data/Mozilla/Firefox/Profiles/towjib3x.default/secmod.db
filename: Documents and Settings/Administrator/Local Settings/Application Data/IconCache.db
filename: Documents and Settings/All Users/Application Data/VMware/Compatibility/native/wpa.dbl
filename: Documents and Settings/All Users/Application Data/VMware/Compatibility/virtual/wpa.dbl
filename: Documents and Settings/All Users/Documents/My Pictures/Sample Pictures/Thumbs.db
filename: Documents and Settings/Devon/Local Settings/Application Data/IconCache.db
filename: Documents and Settings/Jean/Application Data/acccore/nss/cert8.db
filename: Documents and Settings/Jean/Application Data/acccore/nss/key3.db
filename: Documents and Settings/Jean/Application Data/acccore/nss/secmod.db
filename: Documents and Settings/Jean/Application Data/Mozilla/Firefox/Profiles/c3xj7bxx.default/key3.db
filename: Documents and Settings/Jean/Application Data/Mozilla/Firefox/Profiles/c3xj7bxx.default/cert8.db
filename: Documents and Settings/Jean/Application Data/Mozilla/Firefox/Profiles/c3xj7bxx.default/secmod.db
filename: Documents and Settings/Jean/Local Settings/Application Data/IconCache.db
filename: Documents and Settings/Jean/Local Settings/Temp/QQGames/inst/images/Thumbs.db
filename: Documents and Settings/Jean/My Documents/My Pictures/Thumbs.db
filename: Program Files/Tencent/QQ Games/LocalizationRes/en-us/DailyTip/images/Thumbs.db
filename: Program Files/Tencent/QQ Games/LocalizationRes/en-us/DailyTip/images/tips/Thumbs.db
filename: Program Files/Tencent/QQ Games/Res/AD/inst/images/Thumbs.db
filename: Program Files/Tencent/QQ Games/Res/CAAddins/AvatarRoom/Thumbs.db
filename: Program Files/Tencent/QQ Games/Res/CAAddins/Chat/Thumbs.db
filename: Program Files/Tencent/QQ Games/Res/CAAddins/GraRom/Thumbs.db
filename: Program Files/Tencent/QQ Games/Res/CAAddins/Match/Thumbs.db
filename: Program Files/Tencent/QQ Games/Res/CAAddins/Thumbs.db
filename: Program Files/Tencent/QQ Games/Res/ChannAdi/AdMiniGa/Thumbs.db
filename: Program Files/Tencent/QQ Games/Res/ComplainRoom/Thumbs.db
filename: Program Files/Tencent/QQ Games/Res/Download/Thumbs.db
filename: Program Files/Tencent/QQ Games/Res/FrameDlg/Thumbs.db
filename: Program Files/Tencent/QQ Games/Res/MainWin/Border/Thumbs.db.keep
filename: Program Files/Tencent/QQ Games/Res/MainWin/Button/Thumbs.db.keep
filename: Program Files/Tencent/QQ Games/Res/MainWin/Thumbs.db.keep
filename: Program Files/Tencent/QQ Games/Res/MainWin/Tray/Thumbs.db.keep
filename: Program Files/Tencent/QQ Games/Res/MainWin/web/Thumbs.db.keep
filename: Program Files/Tencent/QQ Games/Res/playerinfopanel/Thumbs.db
filename: Program Files/Tencent/QQ Games/Res/qqshow/Thumbs.db
filename: WINDOWS/system32/wpa.dbl

With a quick grep command we can see every file with "sqlite" or ".db" in the name (NOTE:  The -F in this command forces grep to see the .db literally.  The period is commonly associated with a variable.  The command fgrep could also have been used with the same results).  We could have been much more specific with the command here but I will post about grep and similar commands at another time.

We can see that the majority of our internet history information is stored in the users Application Data folders on Microsoft based operating systems.  This is consistent even with modern versions Windows including Windows 7 and 8.  For this example lets look at the following files:

filename: Documents and Settings/Jean/Application Data/Mozilla/Firefox/Profiles/c3xj7bxx.default/formhistory.sqlite


In our application we can see along the left side a navagation bar listing the main database.  This database has a "Tables" section and a "System Catalogue" section.  The tables will always hold the data where the System Catalogue will show the layout of the tables.


The "moz_dummy_table" and "moz_formhistory" portion of this database our each they're own table of information.    With this application you will need to double click on the table before the Full View tab will be populated.


Here we can see that there is data stored in this database.  Including some internet search terms.  Further down we can see stored data like Jean's email address, birth year, and ZIP code.  Once again, other databases may contain complete URL histories and search terms.  We may see some of those in our next database.

In the next database we have multiple tables with important information.

filename: Documents and Settings/Jean/Application Data/Mozilla/Firefox/Profiles/c3xj7bxx.default/places.sqlite


In this database we can see there are multiple tables including some interesting tables like places and bookmarks.


This bookmarks table is exactly what it looks like.  It's a database containing the users bookmarks.  Places is more interest.  It is the complete history of URL.  This history includes dates and times and number of visits:


Using this tool it is not possible to export the database information which would be quite handy for reporting but it does allow you to familiarize yourself with databases.  In an upcoming post we will talk about creating databases for use with forensic tools like fiwalk.  It is important to remember that these database tables may be laid out differently than one another but actually contain great data if you are will to look for it.  Look at the databases in this evidence file and see if you can't put some of the pieces of the puzzle together for yourself (hint - favicons).